Sunday, 24 November 2013

chicken & pumpkin lasagne


Baked pasta dishes, and especially lasagne are loved by most people i know. My trouble is that as much as I think they're delicious I often find that healthier versions don't always hit the right spot. What I've tried to do with this recipe is create 'lighter' version by upping the veg quota, cutting down on the pasta layers and not having too much meat. You could very easily make this an entirely vegetarian dish by using more mushrooms, no chicken and using vegetarian cheeses.


Pumpkin & Tomato Sauce
600g pumpkin or butternut squash, peeled, de-seeded and cut into 3cm chunks
6 large cloves of garlic
1 tbsp vegetable oil
400g can of peeled plum tomatoes
1 tsp dried oregano
25g butter
1 medium onion, peeled and cut in half

White Sauce
500ml milk
30g butter
30g plain flour
200g grated cheese (I used a mixture of parmesan and cheddar)

250g cooked chicken (about 1 chicken breast), cut or shredded
handful of green beans, cut into bite sized pieces
couple of handfuls of spinach, washed
200g oyster mushrooms
1 medium aubergine
1 medium courgette
dried lasagne sheets
small bunch of basil
ground all spice
salt and pepper
vegetable oil for frying

Tomato & Pumpkin Sauce
  1. Preheat the oven to 200C. Place the peeled, cubed pumpkin and un-peeled garlic cloves on a baking tray, pour over the oil and rub everything together with your hands so that everything has a coating of oil and is in a single layer. Roast in the oven for around 40minutes or until the pumpkin is cooked through and slightly coloured on the edges. Take care not to burn the garlic.
  2. Meanwhile prepare the tomato sauce base by placing the tomatoes, halved onion, butter and oregano in a saucepan, place over a low heat and leave to gently bubble away, stirring occasionally and breaking up the tomatoes with the back of a wooden spoon if you wish for about 30 minutes. Once the tomatoes have reduced down and are not all watery remove from the heat and take out the onion.
  3. In a food processor or blender put the pumpkin chunks, tomato mixture and peeled, roast garlic and blitz until smooth. You may need to add a little water to loosen it up - you're aiming for a thick, pouring consistency. Taste then adjust seasoning with salt, pepper and ground allspice as needed.  


White Sauce
  1. Put the butter and cornflour in a saucepan over a medium heat and stir constantly until the butter is completely melted and you've got a thick paste. Cook the flour out for a minute. 
  2. Next add the milk a little at a time, stirring thoroughly as you go. Make sure you have an even consistency before you add the next bit of milk. Continue you until you have a fairly thick white sauce and cook out for a couple of minutes and the taste of raw flour has disappeared. The sauce should coat the back of a spoon. 
  3. Remove from the heat and stir through 160g of the grated cheese, a little ground black pepper and a pinch of allspice or nutmeg. 
Vegetables
  1. Slice the courgette and aubergine lengthwise to a about half a centimetre thickness. 
  2. Put some oil for shallow frying (about a centimetre depth) in a wide frying pan over a medium heat.
  3. Once the oil is at temperature (you'll know it's ready when a piece of aubergine sizzles as soon as it touches the oil) fry off the courgette and aubergine slices in batches until the are a light golden colour on both sides then set to one side to drain on kitchen paper until you're ready to assemble the lasagne. NOTE: If you want to be particularly healthy don't fry the aubergine and courgette slices instead griddle them. I didn't because I don't currently own a griddle pan.
  4. In a pan of gently boiling water quickly blanch the green beans for about a minute then remove and place straight away in ice cold water. 
  5. Heat another pan, add the chopped, washed spinach and quickly wilt it then remove to a colander to allow the excess water to drain away. Set to one side.
  6. Chop up the oyster mushrooms.

Putting it all together
  1. Preheat the oven to about 200C. Combine the chopped mushrooms, beans, cooked chicken and pumpkin and tomato sauce.
  2. Place a little of the white sauce on the base of your oven proof dish then put a single layer of lasagne sheets. Spread over the spinach followed by the aubergine slices, half the reserved cheese, half of the chicken and pumpkin mixture and scatter over some of the basil leaves.
  3. Next place another pasta layer, followed by the courgette slices, the rest of the cheese, remaining chicken mixture, basil leaves, and top with a final pasta layer followed by the white sauce.
  4. Put the dish in the oven for around 30 minutes or until cooked through and golden brown on top. Serve with a crisp salad and maybe some garlic bread too.

Sunday, 17 November 2013

fried egg and spicy chorizo rice


When we're home on the weekend I will often make us a lazy, slightly indulgent brunch - the sort that you want when you're perhaps feeling a little worse for wear from the night before. I usually crave something a little spicy, there needs to a certain 'stodgy' quality to it and there must be eggs involved too. This is a very easy to make dish can have infinite variations depending on your level of creativity. I think it could be wonderful with some cheese melted on top or stirred through, maybe add in some chopped carrots, peppers, mushrooms, sweetcorn and/or peas along with the onion for a healthier option or use a different kind of sausage. Really do whatever takes your fancy but I do urge you to top it off with a crispy-edged but runny-yolked fried egg. It rocks.

Ingredients serves 2 greedy people
3 spicy chorizo-style sausages, raw
1 medium onion, diced
2 garlic cloves, chopped
1 green chilli, de-seeded and chopped (optional)
180g white rice
500ml chicken stock
1 tsp smoked paprika
1 tbsp vegetable oil
salt and pepper to taste
2 organic fried eggs, to serve
  1. Heat up a wide frying pan or casserole that has a lid. Add the oil then remove the sausage meat from the casing and place bite-sized pieces in to the pan. Cook over a medium heat until it starts to develop browned edges.
  2. Add the onion, garlic and chilli to the pan and stir scraping the bottom of the pan with your wooden spoon to pick up any of the stuck on tasty stuff from the sausages. Keep cooking, stirring the whole time until the onions start to turn translucent. 
  3. Add the rice to the pan, stir through so that everything is well combined and the rice starts to pick up colour from the chorizo juices. Add the paprika to the stock, stir then add the whole lot to the pan. 
  4. Once the stock in bubbling put the lid on the pan and leave to bubble away on a medium to high heat for 5 minutes. Do not stir or do anything else to the pan at this time. When 5 minutes is up leave the lid on the pan, turn of the heat then leave for 15 to 20 minutes or until the rice has absorbed all the liquid and is cooked through. 
  5. In the mean time you can fry your eggs how you like them then serve the rice up with the egg on top. Yum.


Saturday, 9 November 2013

pork ball and noodle soup


Life is all about balance and sometimes you just need to give your body something nutritious and tasty. This is especially true if you've just had a big slice of apple pie with cheddar cheese crust! This soup is very, very easy to make, incredibly healthy and best of all it's delicious. If you can't get hold of the wood ear mushrooms where you are by all means substitute another kind such as oyster mushrooms. Equally if you can't track down egg tofu, silken tofu will work perfectly well and is available in pretty much every supermarket in the UK.


Ingredients serves 2
250g lean pork mince
1 tube egg tofu cut into slices
2 handfuls of wood ear mushrooms
bunch of coriander with the roots (if possible)
1 tsp ground white pepper
small bunch spring onions
1 litre water or good quality chicken stock
100g glass noodles (uncooked) or 200g shiritaki noodles (1 packet)
1 tbsp soy sauce
couple of handfuls of chopped white or chinese cabbage (or similar)
Chilli paste, lime wedges and extra soy sauce to serve

  1. Mix together the pork mince, white pepper, soy sauce and finely chopped coriander root in a bowl.
  2. In a large sauce pan bring the water or stock to a gentle boil then make small balls out of the pork mixture and place in the stock.
  3. Gently simmer for 5-10 minutes or until the pork balls are cooked through. The add the mushrooms, cabbage, noodles, spring onions, chopped coriander leaves and egg tofu and cook for a further 3-5 minutes. Take care when stirring and try not to break up the tofu too much. 
  4. Serve with chilli paste, lime wedges and extra soy sauce to taste.


apple pie with cheddar cheese crust

I love apple pie. Short, rich pastry encasing sweet, soft apples flavoured with cinnamon - what's not to love? I've been hearing a lot about cheese incorporated into the pastry crust of an apple pie quite a lot recently, and whilst it sounds a little weird at first there was something about the combination that seemed to make sense. You can experiment with any kind of cheese but I decided on that for my first attempt I would try a medium mature cheddar.  This pie is delicious with a drizzle of cream, custard or a good dollop of ice cream.


Ingredients
For the pastry:
225g plain (all purpose) flour
100g softened butter
75g grated cheddar
3-4 tbsp ice cold water

For the filling:
5-6 eating apples (such as golden delicious, granny smith, jazz) peeled, cored and finely sliced
6 tbsp soft brown sugar (adjust this to your own taste)
1/2 tbsp ground cinnamon
1 tbsp cornflour, regular flour or semolina
  1. Start by making the pastry. Combine the butter and flour in a large bowl and rub between your finger tips until everything is combined and is the texture of coarse breadcrumbs. Alternatively you can pulse the two together in a food processor until you have achieved the same consistency.
  2. Add all the cheese and a couple of tablespoons of the water and bring together the breadcrumbs until a rough dough ball is formed. You may need to add some extra water or not as much. Be guided by the consistency you achieve, just remember you want to handle and work the pastry as little as possible to make sure it retains its short, crumbly texture when cooked. Cover the pastry in cling film and leave to rest in the fridge for at least 30 minutes. 
  3. Once the pastry has rested, pre-heat your oven to 220C. Next put the sliced apples, sugar and cinnamon in a large bowl and mix together until the apple is thoroughly coated in everything.
  4. Cut off a third of the pastry and set aside for the lid. With the remaining two thirds roll it out thinly so that it is large enough to line the base of your pie dish. Alternatively you can coarsely grate the pastry into the pie dish and push together the pieces to form the base. 
  5. Sprinkle the cornflour over the base (this will help to avoid a soggy bottom on your pie) then spread the apple mixture over the top. 
  6. Roll out the pastry for you lid then carefully place it over the filling. Crimp together the edges and cut a hole in the top to allow steam from the filling to escape. You can use beaten egg on the rim of the pastry to help it join together if you like but I didn't find it was needed. 
  7. Brush the top with beaten egg or milk if you want a golden, shiny top then place the pie in the oven. Cook at 220C for 10 minutes then reduce the temperature to 190C and continue to cook for a further 45 minutes or until the pie is golden brown and cooked through. Remove from the oven when it's done and leave it to cool for 20 minutes or so before eating.


Saturday, 14 September 2013

homemade pierogi ruskie from scratch


I love pierogi. Not a particularly shocking statement from a woman with a fiercely patriotic Polish grandmother, but true nonetheless. For me the best pierogi have to be the classic 'ruskie' version filled with mashed potato, golden fried onions and cheese. Other pierogi such as sauerkraut and mushroom or meat fillings are perfectly lovely but nothing beats a well made pierogi ruskie gently cooked in butter or lard until it is golden and crispy on the outside and topped with a generous scattering of crispy onions in butter or small pieces of crispy bacon. This is definitely not health food but it's sometimes the only thing that will make you feel better about life or help to cure your homesickness. As children we'd normally have them for dinner with some baked beans or a big splodge of tomato ketchup - I guess this is a symptom of being raised in an anglo-polish family. It's not so easy to get hold of the right cheese, twarog or farmers cheese, for pierogi ruskie in Bangkok so I decided to make my own rather than substitute. It's very easy to get twarog back in the UK now, just take a look in the chilled cabinet in any big supermarket and it'll be alongside all the other 'ethnic' goods along with some half decent kielbasa. It's not at all difficult to make twarog though so why not give it a go if you have the time. For my home made twarog I follow the method described perfectly by the ever creative Chip Butties and Noodle Soup.

The Dough (This recipe is based on Beata Zatorska's which can be found here.)
To make the pastry for about 120 pierogi

1kg plain flour
125g unsalted butter at room temperature
500ml warm water

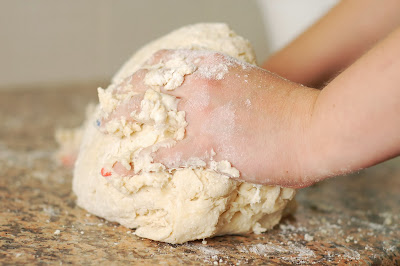
  1. Put the flour on to a big open work surface and rub in the butter then mix in the water little by little until you have a soft, pliable dough. 
  2. Place in a bowl and cover over to avoid it drying out while you prepare the filling.


Pierogi Ruskie Filling
1kg approx cooked mashed potato
500g twarog (Polish Farmer's Cheese)
1 large onion, finely diced
2 tbsp of butter
salt and pepper to taste
  1. Cook the onion with the butter until soft and golden brown.
  2. Mix the mashed potato, onion, cheese, salt and pepper together until thoroughly combined. 


Putting it all together
  1. Roll out a piece of the dough on a floured surface to about 3mm thick then using a cutter or up-turned glass cut out circles of about 8cm diameter.
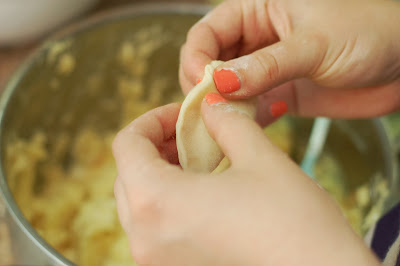
  2. Fill each disc with a teaspoon of the potato and cheese mixture then fold the disc over and crimp the edges together with your thumb and forefinger. 
  3. Once you've made a few you can either cook them immediately in boiling salted water. This should only take a few minutes, they're done when they float back up to the surface. Alternatively you can freeze them then cook when you want them. If you choose to freeze them, put them in the freezer in a single layer on baking parchment. Once they're frozen put them in a zip lock bag for easier storage. You can cook them directly from the freezer.
  4. One of my favourite ways to serve pierogi is to fry them in a little butter after they've been boiled. Cook them until they're crispy and top with crispy cooked onions or bacon bits. 
NOTE: I recently tried a different cooking method for preparing the pierogi from frozen, similar to that used when you cook frozen gyoza. I heat a little oil in a non-stick pan and put a single layer of pierogi in the pan then cook them for 2-3 minutes or until they just begin to colour. Next add recently boiled water from the kettle so that the pierogi are 2/3 covered in water. Cover the pan and cook on a medium heat for 10 minutes. If at the end of this time the water hasn't completely evapourated remove the lid and allow to cook until the water has completely disappeared and the pierogi have crispy bottoms.


I've added these awesome pierogi to Made with Love Mondays over at Javelin Warrior's site.

Made with Love Mondays, hosted by Javelin Warrior

I've also contributed to the Four Seasons Food: Autumn


Four Seasons Food
Four Seasons Food hosted by Delicieux and Eat Your Veg

Wednesday, 4 September 2013

chocolate banana bread


Before I arrived in Thailand I was often thinking about what food I might miss from home with cheese, proper fish and chips and good quality baked goods always pretty high on my list. What I wasn’t prepared for was the abundance of excellent and delicious baked cakes, breads and pastries that seem to be available everywhere. This sweet, enriched bread recipe is inspired by Thai flavours and ingredients and happens to be almost entirely vegan if you used a vegan chocolate. It is essentially an enriched dough with the egg replaced by banana and the coconut oil and milk replacing dairy butter and milk. This chocolate banana bread makes a delicious treat breakfast or is good with a cup of tea of coffee any time of day.


Ingredients
2 medium bananas (approx. 1 cups mashed banana)
200ml coconut milk
55ml coconut oil
380g/3 cups bread flour
2 tsp fast action yeast
200g dark chocolate cut into rough chunks
generous pinch of salt
50g palm sugar (or brown sugar)

  1. Mash together the bananas and stir in the coconut oil then place into a large mixing bowl along with all the other ingredients apart from the chocolate and bring together into a rough dough. 
  2. Turn out onto an oiled surface and kneed for a few minutes then place into an oiled bowl, cover with plastic wrap then leave in a warm place to rise for around 2 hours. You may need to adjust the flour or moisture level at this stage but do this with care adding a spoon of flour or water as needed. 
  3. After the first rise add in the chocolate chunks and gently fold the dough over them creating before turning out on to a baking tray lined with parchment or a loaf tin. I quite like the free form style with this bread but feel free to shape as you wish. Sometimes I mix the chocolate chunks through the dough making sure it is evenly spread or, as I have done in this version I have kept most of the chocolate contained in the centre of the dough so you have yummy almost solid chocolate centre to bite into. I was going for the kind of bite you get with a good pain au chocolat. 
  4. Cover with plastic wrap and leave for another hour or so until it has risen to almost double the original size. 
  5. Pre-heat the oven to 230C then place a roasting pan filled with some water in the bottom of the oven to create some steam during the baking process. 
  6. Place the bread in the oven, reduce the heat down to 200C and bake for about 30-40 minutes or until you have a golden crust. 


follow me

Follow Us